Photographs by Sean Gin

Dear My Client Tiffany That Asked How To Make Your Own Frame,
Do you have a giant painting sitting in your house? Is it naked? Afraid? Frameless? If so keep reading, if not spare yourself. I devised this super-simple/cheap solution to framing large paintings a while back when I made a big painting for a client. And now I’m going to share this amazing money saving secret with you.

I made the above painting a few weeks ago while I was frantically cleaning my apartment. I’ve nixed my gallery wall in favor of one large piece. Mainly because I got tired of my gallery wall and I rearrange my apartment every weekend. Rearranging my apartment is my new boyfriend. Below are some of the materials you’ll need to make your own frame:

What You’ll Need:
1. A large paintng
2. 4 pieces of 1″ x 2″ pine wood cut to the exterior size of the painting
3. Medium-grit sandpaper
4. A neon green power drill
5. 12 2″ wood screws
6. Satin finish paint
7. Wood filler/moldable epoxy

1. Cut the wood to size, while frowning.
I don’t have a chopsaw or a proper workspace, so to make things easier and save time, I have the wood cut to size at Anawalt Lumber in West Hollywood. I like to go to smaller hardware stores for stuff like this because they’re far more helpful than giant hardware stores where you have to walk a mile to find the right kind/size of wood. Sidenote: have you ever cried because you’ve been in Home Depot for over an hour and you’re ready to leave and then you remember that you forgot to get sandpaper but the sandpaper is 3/4 miles away? I have.

2. Pre-drill holes to screw the pieces together.
Using the painting as a template, pre-drill holes to screw it together. Do this on the ground so you can make sure everything is flat/even. At this point, it’s very important to make sure the edges match up perfectly so that your finished frame looks as flawless and expertly executed as everything else in your life. Make sure to sink your screws at least 1/16″ so you can patch them up later without unsightly bumps.

3. Fill in gaps/screw holes with epoxy wood repair.
I used a great product that fills in gaps to cover all the seams and screw holes. Because I am a barbarian, I just used my fingers. Also, it’s pliable like clay so it kind of makes sense to use your hands. Fill in all gaps and holes and let sit for an hour. While you wait for the epoxy in the gaps to dry, think about all the gaps in your life and how nice it would be if you could just buy a product to fill them.

4. Sand out any bumps.
Sand out any bumps or splinters to prep the wood for painting. If you don’t know how to sand, imagine you’re a sexy lady in a bikini washing a car in front of a bunch of gross straight guys eating messy hamburgers. Just rub that sandpaper all over that wood whilst making a smoldering, sexy face, pretending not to be disgusted.

5. Paint it white!
Or another color. White and black are great options. But the frame color totally depends on the art itself so consider your options before you commit to anything. You can also try staining it, but disguising them screw holes might prove more trouble than it’s worth. Let dry for 2 hours, unless it’s super hot where you are then you probably only need like 40 minutes.

6. Place the painting back in the frame.
If it fits, you’re a genius and deserve *so* many hugs. Go and find a friend or loved one and ask him or her for the hugs you deserve. If you can’t find anyone you know, ask a meter maid or a beggar woman!

7. Stare at the succulents on your terrace and think about how much you love them, life, and California.
This actually isn’t even my terrace. It belongs to my neighbors. Sometimes I break in when I need to do a big project that requires being outdoors. Let this be a lesson to all of us to break-and-enter if we don’t have enough workspace in our apartments.
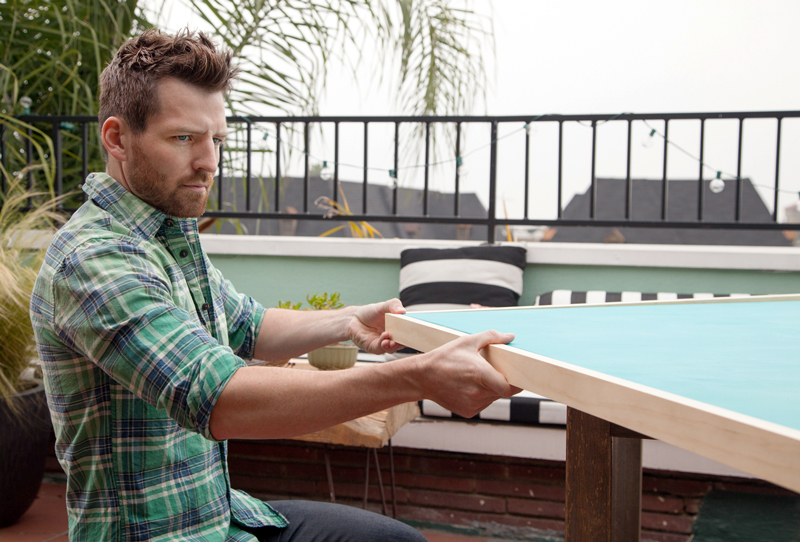
8. Using four screws, affix the frame to the painting.
Using one screw per side, drill through the side of the frame into the painting. It’s kind of a bummer to damage the painting slightly, but it’s worth it when you see how glamorous it looks in its frame.

9. Patch your screw holes. Again.
This patching is way easier because it’s just small screw holes. After you’ve patched them wait an hour. Sand and paint them and *BOOM* your frame is done.

10. Hang your painting, then hang out with it!
Now that my painting is framed everyone who comes into my apartment assumes I’m a millionaire. I sit with my painting every night and tell it about my day, all the crazy people that yelled at me and the palm trees I saw and liked. Art really does make your life better.
Total Rough Cost:
Wood: $20
Screws: $1.50
Epoxy: $3
Sanpaper: $0.50
Paint: $5
Total: $30
Go make a frame!
Love,
Orlando
I like your D.I. Whys best when you wear tank top and shorts. Just something for you to think about.
I legit (quietly because I am a g.d. lady) snort-laughed my way through this. Sadly, my huge painting that could use a new frame was done by my uncle in the late 70s. The thought of putting screws into it is too horrifying to contemplate. Plus I’m not sure wood from 1977 is up to the challenge.
There are so many wonderful things about its post but all I can think of is your beautiful plaid shirt. You are the coolest guy. Also, you look thin. You should eat a cheeseburger.
Thanks! Suzan
>
This is equally genius and hilarious. Also much prettier then my normal solution to framing large art which is to stalk thrift stores until I find a giant frame that I can just fill with a canvas.
I’d trade my boyfriend for that beautiful blue sofa.
thank you so much for diy posts like this. Practical useful how to’s that I really am inspired by. Now I can make the canvas and the frame for the giant PBN I’m planning.
Love it all x
Next step : find a cute guy to do the work 🙂
thanks for the post, On pinterest I seen some graphic shower curtains used as art, this could possibly fit the bill as a framing solution, and bonus it would be a way to involve hubby in the process of updating the dining room.
Following you instructions and my frame on my large print is starting to look fabulous Thank you so much for posting this DIY. Instructions are nice and clear. Good job.
Brilliant! Cool frame with attitude. Wonder if my pink drill will work as well as your lime green one? Thank you my friend. Lynette artist also.
great post ! i’m going to try this 😉
Hello. Any ideas on how to do something similar for a poster? I bought Gently Rippled Blue Water
By: Heather Perry sized close to 4′ x 5′ a couple years ago and it’s just sitting rolled up. I’d like to hang it without tearing it or making it so heavy my old walls can’t hold it. Thank you.
Fantastic blog post! Easy to understand and beautiful result! Question…how did you hang your sign? I have large (ex. 3’x4′) framed wood signs that I make, so kinda heavy, and I’m terrified one will fall off the wall and hurt someone! Frame is secured with both wood glue and nails…maybe I should use screws instead? Thanks!